 how-to
How to Identify Storm Damage on Your Roof
Table of Contents
- What You'll Need Before You Inspect for Storm Damage on Your Roof
- Step 1: Start with a Ground-Level Visual Inspection
- Signs of Hail Damage on Asphalt Shingles
- How to Spot Wind Damage on Your Roof
- Step 2: Inspect the Attic and Interior for Water Intrusion
- Storm Damage vs. Normal Wear and Tear: How to Tell the Difference
- Roof Storm Damage Insurance Claim Process: A Documentation Guide
- When to Call a Professional Roofing Contractor
- Frequently Asked Questions
Last Updated: August 13, 2026
What You'll Need Before You Inspect for Storm Damage on Your Roof
Rushing to inspect your roof without preparation is the most common mistake homeowners make, it leads to missed damage and unnecessary injury. Storm damage is any deterioration caused by weather events, hail, high winds, heavy rain, or falling debris that compromises the roofing material's protective ability. Before you begin, gather the right tools, protective equipment, and a camera or smartphone for photo documentation, which is critical for insurance claims.
Safety Equipment Checklist
A wet or granule-covered roof surface is dangerously slippery, and a fall from even a single-story home causes serious injury. Use this checklist before any inspection:
- Non-slip rubber-soled boots
- Safety harness and rope anchor (required for any roof pitch above 4:12)
- Sturdy extension ladder, rated for your weight plus gear
- Work gloves for handling shingles and debris
- Safety glasses
- Smartphone or digital camera for documentation
- Notepad or inspection app for notes
- A helper on the ground to stabilize the ladder
The Occupational Safety and Health Administration ladder safety guidelines specify that ladders must extend at least 3 feet above the roof edge and be placed on stable, level ground. If you're not comfortable at height or the roof pitch is steep, stay on the ground and use binoculars, a ground-level inspection catches the majority of significant storm damage.
Step 1: Start with a Ground-Level Visual Inspection
The ground-level walkround is the foundation of any proper storm damage assessment. Start at one corner of your home and walk the entire perimeter slowly, examining each roof plane from multiple angles. Binoculars let you examine ridge lines, valleys, and flashing details without climbing.
Work through this sequence:
- Scan the overall roofline for sagging, uneven ridges, or obvious missing sections.
- Check the gutters and downspouts for granule accumulation, heavy granule loss after a storm is a clear sign of hail impact.
- Look at the drip edge and flashing around chimneys, skyllights, and vents. Bent or displaced flashing indicates wind damage.
- Inspect the yard for shingle pieces, torn underlayment strips, or debris blown off the roof.
- Check soft metal surfaces, gutter guards, AC condenser fins, window screens, for dents. Impact marks on these surfaces indicate your roof took hail hits.
- Photograph everything from ground level before moving closer.
This walkround takes 15-20 minutes and frequently reveals enough evidence to justify a professional inspection without any roof access.
Signs of Hail Damage on Asphalt Shingles
Hail damage on asphalt shingles is frequently misidentified because it doesn't always look dramatic. On asphalt shingles, hail impact creates a specific pattern that distinguishes it from normal wear.
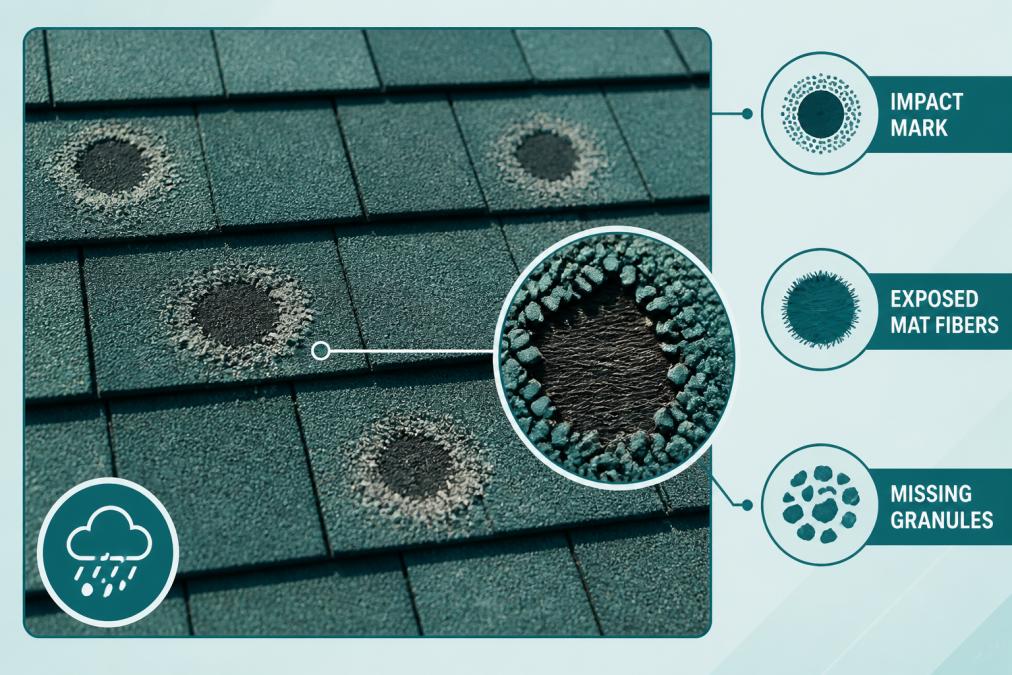
The primary signs of hail damage on asphalt shingles include:
- Circular impact marks with a dark, bruised appearance at the center
- Exposed mat fibers where granules have been knocked away, leaving a raw, shiny spot
- Soft spots that feel slightly spongy when pressed
- Random pattern distribution across the shingle surface
A common mistake is confusing hail impact marks with blistering, which is a manufacturing or ventilation issue. Blistering produces raised, bubble-like spots that pop and leave a crater. Hail marks are flat depressions. This distinction matters enormously for insurance purposes.
Granule Loss and Soft Metal Dents
Granule loss is the most reliable early indicator of hail damage. Granules protect the underlying asphalt mat from UV degradation. When hail knocks them loose, the mat accelerates its deterioration dramatically.
Check your gutters and downspout outlets after any significant hailstorm. A notable accumulation of dark, sand-like granules in the gutter trough signals hail impact. Soft metal surfaces tell an equally important story. Roof vents, gutter sections, aluminum flashing, and chimney caps all dent on hail impact. If your gutters or vents show consistent circular dent patterns, you almost certainly have corresponding damage to the roofing material above.
How to Spot Wind Damage on Your Roof
Wind damage follows different logic than hail damage. Hail hits uniformly across exposed surfaces. Wind damage concentrates at the roof's weakest structural points: ridges, eaves, rakes, and any area where the seal strips between shingles have failed.
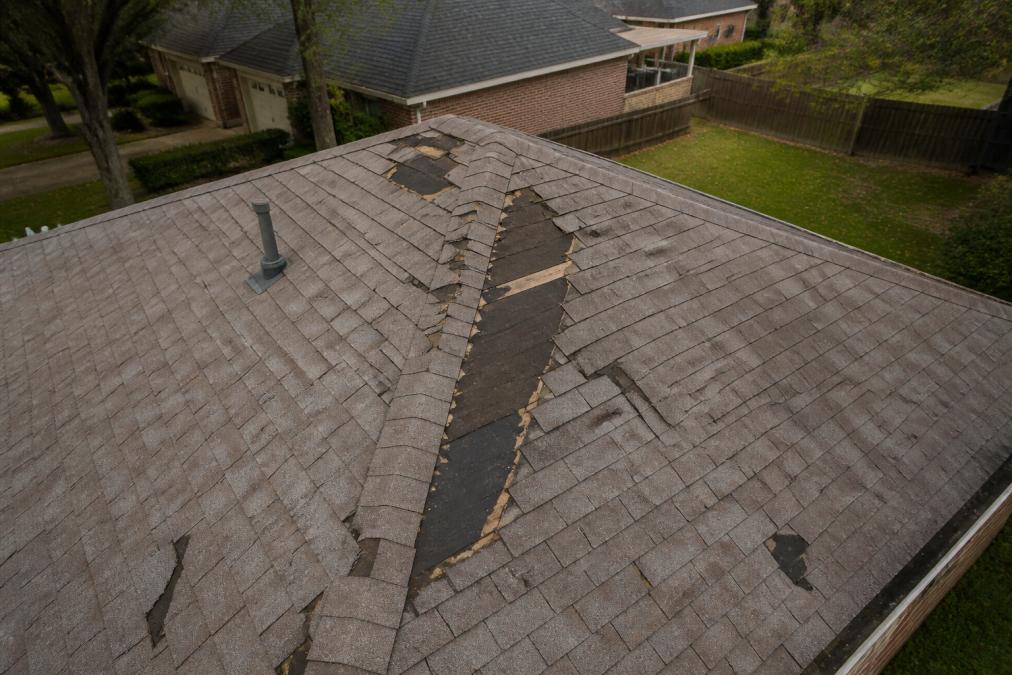
Key indicators of wind damage include:
- Missing shingles, often occurring in strips along the ridge or at eave edges
- Curled or cupped shingles that have been lifted by wind uplift
- Exposed underlayment visible from ground level
- Damaged or displaced chimney flashing
- Debris impact damage from tree branches or airborne objects
Missing Shingles vs. Lifted Seal Strips
Seal strips are the adhesive bands on the underside of each shingle that bond it to the shingle below. High winds can break this bond without removing the shingle entirely. The shingle looks intact from the ground but is no longer sealed and will leak in the next rain.
To check for lifted seal strips, look for shingles that appear slightly raised, rippled, or misaligned compared to undamaged sections. Any shingle that has lost its bond needs to be resealed or replaced.
According to the Insurance Information Institute's homeowner claims guidance, wind is one of the leading causes of homeowner property insurance claims. Documenting both missing shingles and lifted seal strips gives your adjuster a complete picture of the wind uplift event.
Step 2: Inspect the Attic and Interior for Water Intrusion
The attic inspection is the step most homeowners skip, yet it catches the hidden damage that costs the most to fix. Water intrusion doesn't always produce an immediate interior stain, it can travel along roof sheathing, rafters, or insulation for weeks before appearing as a ceiling stain. Getting into the attic within 48 hours of a major storm catches early-stage water intrusion before mold and structural damage develop.
Bring a flashlight and look for:
- Moisture stains on the underside of the roof deck
- Wet insulation, compressed, discolored, or matted batt insulation
- Daylight gaps around roof vents, chimney penetrations, or at the ridge line
- Active drips or wet spots on rafters and collar ties
- Mold or mildew odor, a musty smell indicates sustained moisture exposure
Pay particular attention to areas around roof penetrations: vents, pipes, skylights, and chimney flashing. These are the highest-risk points for water intrusion because flashing seals often fail first under wind or hail impact.
Storm Damage vs. Normal Wear and Tear: How to Tell the Difference
Insurance policies cover sudden storm damage, not gradual deterioration from age or weather exposure. Knowing the difference protects you from both over-claiming and under-claiming.
| Characteristic | Storm Damage | Normal Wear and Tear |
|---|---|---|
| Pattern | Random, concentrated post-storm | Uniform across entire roof |
| Timing | Appears after specific weather event | Develops gradually over years |
| Appearance | Impact marks, acute tears, fresh granule loss | Curling, blistering, slow granule loss |
| Shingle condition | Otherwise sound, isolated damage | Widespread aging, cracking throughout |
| Soft metal evidence | Dents on gutters/vents matching impact | No corresponding metal damage |
| Neighbor comparison | Neighbors show similar damage | Damage isolated to your property |
The key diagnostic question: does the damage correlate with a specific storm event? If your neighbor's roof, your car, and your gutters all show evidence of the same hailstorm, that's a corroborating pattern an adjuster can work with.
Blistering is a particularly common misidentification. Blistered shingles result from trapped moisture or inadequate attic ventilation, not storm impact. An insurance adjuster will recognize blistering immediately and exclude it from storm damage coverage.
According to the National Roofing Contractors Association's roofing maintenance guidelines, regular inspections help establish a documented baseline of your roof's condition, which makes it significantly easier to demonstrate that specific damage is new and storm-related.
Roof Storm Damage Insurance Claim Process: A Documentation Guide
Thorough documentation separates successful claims from denied ones. Most homeowners file claims without adequate evidence and then wonder why their adjuster's assessment comes in lower than expected.
Follow this documentation sequence immediately after a storm:
Within 24 hours:
- Photograph all exterior damage from ground level, every elevation of the house
- Photograph soft metal damage: gutters, downspouts, vents, AC units
- Collect and photograph granule accumulation in gutters
- Photograph any interior water stains or attic moisture evidence
- Note the storm date, time, and any weather service reports confirming hail or high wind events
Before your adjuster visit:
- Pull your local weather service data for the storm event from the National Weather Service storm event database
- Gather your current homeowner's insurance policy and review your deductible and coverage terms
- Request a written estimate from a licensed roofing contractor before the adjuster arrives
- Document your roof's age and any prior repairs with receipts if available
During the adjuster visit:
- Walk the roof with your adjuster; do not let them inspect alone
- Point out every item you documented, including soft metal dents
- Ask for a written scope of loss before any work begins
The roof storm damage insurance claim process typically takes several weeks from initial filing to claim settlement. Keep copies of every communication in writing.
When to Call a Professional Roofing Contractor
Some storm damage assessments are straightforward DIY tasks. Others require professional expertise.
Call a professional roofing contractor when:
- You can see missing shingles or exposed underlayment from the ground, this is active water intrusion risk
- Your attic shows moisture stains, wet insulation, or active drips, the source needs to be traced by someone who understands roof system behavior
- You suspect hail damage but can't confirm it, the circular impact pattern requires trained eyes to distinguish from blistering
- Your roof is older than 15 years, aging material has reduced structural integrity
- You're filing an insurance claim, having a contractor document and scope the damage before the adjuster's visit ensures full claim coverage
- You have a low-slope or flat commercial roof with TPO or modified bitumen membrane, these require specialized inspection techniques
Certified Roofing Solutions Inc. provides expert residential and commercial roofing services to clients in Marietta, Alpharetta, Dunwoody, and Johns Creek, GA. A common mistake is waiting too long after a storm to schedule a professional inspection. Most insurance policies require claims to be filed within a specific window of the storm event.
The real difference between a smooth insurance claim and a disputed one often comes down to how quickly and thoroughly the initial damage documentation was completed. For significant storm events, a professional contractor who understands the insurance claim process is the most practical decision a homeowner can make.
Identifying storm damage accurately is the first step, but getting it fully repaired is where the real work begins. Certified Roofing Solutions Inc. provides expert storm damage assessments, detailed documentation for insurance claims, and high-quality repairs for both residential and commercial properties. Our experienced team handles everything from missing asphalt shingles to complex TPO and metal roofing systems, with a commitment to transparent scopes of work and no surprise costs. Book an appointment today and get a professional assessment before your claim window closes.
Frequently Asked Questions
How do I tell if my roof has storm damage without climbing on it?
Start from the ground using binoculars. Look for missing or curled shingles, dark patches where granules have washed away, and dents on gutters or downspouts. Inside, check your attic for moisture stains on the decking or insulation. These ground-level and interior checks catch most significant storm damage without requiring you to set foot on the roof. If anything looks suspicious, schedule a professional roof assessment to confirm the extent of the damage.
Can 1-inch hail damage asphalt shingles?
Yes. Hailstones 1 inch in diameter carry enough force to fracture the mat beneath asphalt shingles and knock loose the granules that protect against UV exposure and water intrusion. The damage may not be immediately visible from the ground, but an up-close inspection will reveal circular impact marks, soft spots, and granule loss concentrated around each strike point. Even shingles that look intact after 1-inch hail can have compromised structural integrity that shortens their remaining lifespan.
How long after a storm can you file a roof damage insurance claim?
Most homeowners insurance policies require you to report storm damage promptly, and many set a formal deadline of one year from the date of the storm, though this varies by carrier and state. Filing sooner is always better, delays make it harder to prove the damage was storm-related rather than normal wear and tear. Document everything with dated photos immediately after the storm, and contact your insurer before scheduling any repairs so an insurance adjuster can assess the roof in its damaged condition.
What does wind-damaged shingles look like?
Wind-damaged shingles typically show lifted or curled edges where the seal strips have broken, missing shingles that have blown off entirely, or creasing along the shingle tabs where wind uplift bent them back. You may also see exposed underlayment or bare decking where shingles have detached. On flashing around chimneys and vents, wind can pull the metal away from the roofline, creating gaps where water intrusion begins. Any of these signs warrant a professional inspection before the next rainfall.