 blog
blog
10 Common Types of Storm Damage on Residential Roofs
Table of Contents
- How to Identify Storm Roof Damage: 10 Warning Signs
- 1. Hail Damage: Dents, Punctures, and Bruised Shingles
- 2. Wind Damage: Missing Shingles and Wind Uplift
- 3. Granule Loss and Shingle Wear
- 4. Water Intrusion and Roof Leaks
- 5. Flashing Damage and Compromised Seals
- 6. Ice Dams and Moisture Buildup
- 7. Structural Damage and Roof Deck Issues
- 8. UV Degradation and Thermal Shock
- 9. Gutter Damage and Storm Debris
- 10. Soffit and Fascia Damage
- Material-Specific Damage Patterns: Asphalt, Metal, and TPO
- DIY vs. Professional Inspection: When to Call a Roofing Contractor After a Storm
- The Roof Storm Damage Insurance Claim Process, Step by Step
- Preventative Maintenance After Storm Damage
- Frequently Asked Questions
Last Updated: September 21, 2026
How to Identify Storm Roof Damage: 10 Warning Signs
Storm damage is the leading cause of premature roof failure on homes across the country, and most of it hides in plain sight. This guide from Certified Roofing Solutions Inc. breaks down the 10 most common types of storm damage on residential roofs, what each looks like, which materials fail first, and when a repair turns into a claim.
1. Hail Damage: Dents, Punctures, and Bruised Shingles
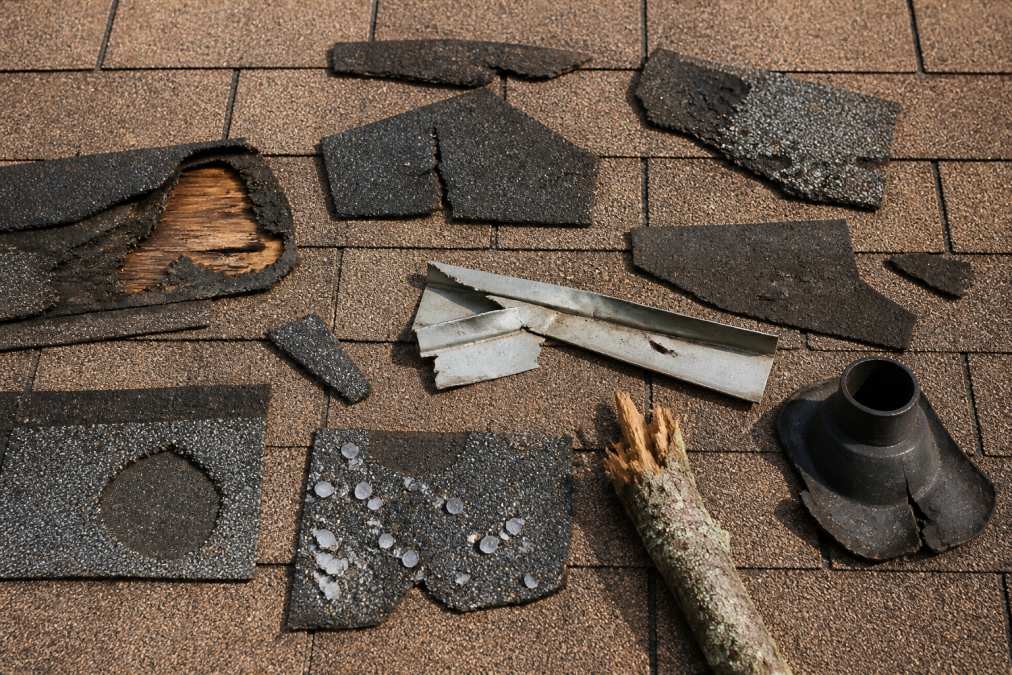
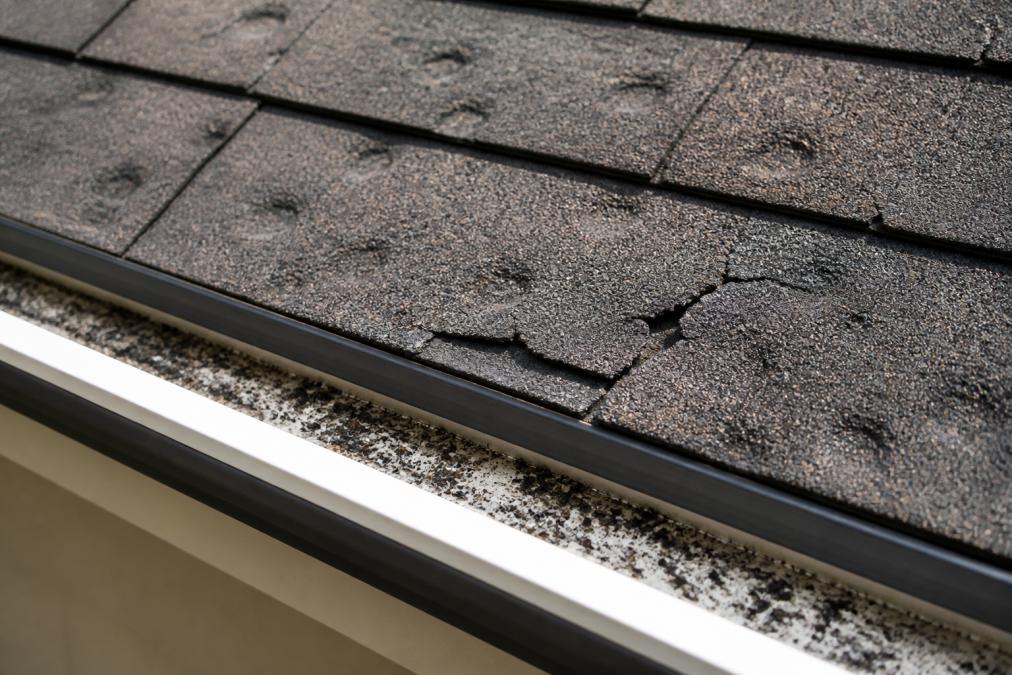
Hail impact leaves soft, bruised spots where shingles lose their protective granules. Look for round dents on shingles, metal vents, and gutters. On asphalt shingles, hail knocks away granules and exposes the mat underneath. That spot dries out, cracks, and leaks within months.
2. Wind Damage: Missing Shingles and Wind Uplift
Wind uplift is the force that peels shingles back from the roof deck. Check ridges, edges, and slopes facing the storm for missing shingles and lifted tabs. Once the seal breaks, rain gets under the next layer fast.
3. Granule Loss and Shingle Wear
Granules protect shingles from sun and rain. After a storm, you may find them piled in gutters or at downspouts. Heavy granule loss means the shingle is aging faster than it should.
4. Water Intrusion and Roof Leaks
Water intrusion is water getting past the roof surface and into your home. Check the attic for stains, damp wood, or a musty smell. Roof leaks often start at flashing, valleys, and nail holes. By the time you see a ceiling stain, the leak has been running for weeks.
5. Flashing Damage and Compromised Seals
Flashing is the metal that seals roof joints, chimneys, and vents. Storm winds bend it. Debris dents it. Once the seal fails, water finds the gap. Check every flashing point after a storm, especially around the chimney and skylights.
6. Ice Dams and Moisture Buildup
Ice dams form when snow melts on a warm roof and refreezes at the cold edge, backing water up under shingles and soaking the roof deck. Look for thick ice at the eaves and icicles along the gutter line.
7. Structural Damage and Roof Deck Issues
Structural damage means the roof deck or framing has moved or weakened. From the yard, look for sagging rooflines or a wavy ridge; inside, check for cracks near ceiling corners. Never inspect this yourself.
8. UV Degradation and Thermal Shock
UV degradation breaks down shingle oils over years of sun exposure. Thermal shock happens when a hot roof cools fast in a storm. Together they cause shingle curling and cracked shingles. South- and west-facing slopes show it first.
9. Gutter Damage and Storm Debris
Gutter damage ranges from loose hangers to crushed sections. Storm debris like branches and shingle pieces blocks water flow, and clogged gutters push water under the roof edge and into the soffit.
10. Soffit and Fascia Damage
Soffit and fascia are the boards under and along your roof edge. They take the brunt of wind-driven rain. Look for peeling paint, soft wood, and water stains. Damaged soffit also blocks attic ventilation, which traps heat and moisture.
| Warning Sign | What to Look For | Urgency |
|---|---|---|
| Hail damage | Dents, bruised shingles, granule loss | High |
| Wind uplift | Missing or lifted shingles | High |
| Water intrusion | Attic stains, musty smell | High |
| Ice dams | Ice at eaves, icicles | Medium |
| Structural damage | Sagging roofline, ceiling cracks | Emergency |
| Gutter damage | Loose hangers, debris clogs | Medium |
Material-Specific Damage Patterns: Asphalt, Metal, and TPO
Different roofing materials fail in different ways, and knowing yours changes what you check. Most storm damage guides describe every roof as if it were asphalt shingles, the biggest mistake homeowners make when self-inspecting, and why damage gets missed on metal and tile roofs that don't bruise like shingles.
Asphalt shingles
Asphalt is the most common residential roofing material and fails in three predictable ways after a storm:
- Hail bruising. A strike knocks granules loose and fractures the mat underneath. The bruise looks like a soft, dark spot, sometimes with a shiny or exposed mat in the center. It may not leak for months, but the fracture spreads with each freeze-thaw cycle.
- Wind uplift. Wind gets under a lifted tab, breaks the seal strip, and peels the shingle back. Once the seal is broken, the next layer is exposed. Check ridges, rakes, and the slopes facing the storm's direction.
- Granule loss. Granules in the gutter after a storm are a wear indicator. Heavy loss on a young roof points to impact; heavy loss on an old roof points to age.
Metal roofing
Metal doesn't bruise, it dents, and the dent is only half the problem. The coating on a painted metal panel can crack at the impact point, exposing bare metal to moisture, so a dented panel can rust for years before it leaks.
- Hail dents on standing-seam panels are most visible on the flat pan between seams, especially in low-angle light.
- Coating fractures around the dent are the real failure point. Look for chalking, rust bloom, or paint flaking at the dent edge.
- Fastener back-out after wind events lets panels lift at the seams. Check the screws along the eave and ridge.
- Oil canning, a wavy, rippled appearance, is usually a manufacturing or installation issue, not storm damage, and adjusters will flag it as pre-existing.
Tile and slate
Tile and slate are brittle. Hail and wind-blown debris crack or chip them, and a single cracked tile can let water past the underlayment. Walk the yard after a storm, broken tile pieces on the ground are the fastest confirmation of impact damage, then check the roof for cracked, chipped, or slipped tiles.
TPO and low-slope membranes
TPO is a single-ply membrane used on low-slope residential roofs, additions, and commercial buildings. It fails differently again:
- Punctures from hail or debris.
- Seam splits along heat-welded seams, which can open quietly and let water travel laterally under the membrane.
- Ponding water at low spots, which stresses seams and accelerates aging.
DIY vs. Professional Inspection: When to Call a Roofing Contractor After a Storm
Call a roofing contractor after a storm when you see missing shingles, sagging, or any sign of water inside. You can safely check your yard, gutters, and attic from the ground, but never walk a steep, wet, or damaged roof.
Here's the threshold most homeowners miss:
- Check yourself: granules in gutters, debris on the lawn, attic stains
- Call a pro: missing shingles, dents across a wide area, sagging, active leaks
- Call immediately: structural movement, a hole in the deck, water pouring in
The Roof Storm Damage Insurance Claim Process, Step by Step
The insurance claim process works best when you document damage before you repair anything, since most policies require prompt reporting and proof. Here's the order that keeps a claim on track:
- Document everything before anything moves. Photograph damage from the ground, the attic, and close up: a wide shot showing the damaged slope in context, a mid-range shot of the affected area, and a macro shot of the specific damage. Date-stamp every image if your camera doesn't do it automatically.
- Report the loss. Call your insurer and open a claim right away. Ask for the claim number and the name of the assigned adjuster in the same call.
- Get a professional inspection. A written report with photos, measurements, and material specifications supports your claim far better than a verbal description.
- Meet the adjuster. Have your inspection report on hand. Walk the roof with the adjuster if your contractor can be there, adjusters often miss damage that isn't visible from the ladder line.
- Review the estimate line by line. Check that it covers decking, underlayment, flashing, ridge caps, and drip edge, not just the shingles. Estimates often replace field shingles but omit the accessories that fail next.
- Approve and schedule repairs. Never start work before approval. Once you accept a scope, changes become supplements, not covered losses.
What to photograph (and why each shot matters)
- Wide shots of each slope, establishes the storm's directional path and which elevations took the hit.
- Close-ups of individual damaged shingles, shows hail bruises, lifted tabs, or granule loss at the mat.
- Gutters and downspouts, accumulated granules are physical evidence of shingle wear; photograph before you clean them.
- Attic interior, stains, damp decking, and daylight through the sheathing document water intrusion the exterior may not show.
- Soft metals, vents, flashing, gutters, and downspouts dent at the same impact energy that bruises shingles, so they corroborate the hail size.
- A ruler or coin next to dents, gives the adjuster a scale reference for impact size.
Hidden damage, supplements, and the timing trap
If an inspector finds rot or a soft roof deck once work begins, that's a supplement, not a surprise bill, a good contractor documents it and files it with your insurer before touching it. Two timing rules matter most:
- Report promptly. Most policies require notice within a reasonable time after the loss. Waiting until the next storm season can give the insurer grounds to reduce or deny the claim.
- Don't repair before inspection. Permanent repairs made before the adjuster sees the damage can void the claim, because the evidence is gone. Temporary tarping to prevent further damage is generally acceptable and often required by the policy's duty to mitigate.
What adjusters actually evaluate
Adjusters compare your documentation against the policy's covered perils, the roof's age and condition, and the storm's verified footprint. A roof near the end of its service life may be settled on an actual cash value basis rather than replacement cost, subtracting depreciation, a policy term, not a negotiation tactic, and why your roof's age and last inspection date matter as much as the damage photos.
Preventative Maintenance After Storm Damage
Preventative maintenance after a storm is cheaper than waiting for the next one. Once repairs are done, schedule an annual roof inspection, clear gutters twice a year, trim overhanging branches before storm season, and check attic ventilation.
Small habits add up:
- Clear storm debris from valleys and gutters
- Re-seal flashing points every few years
- Replace cracked or curling shingles early
- Keep attic vents clear year-round
Frequently Asked Questions
What is considered storm damage to a roof?
Storm damage includes any physical harm caused by hail, wind, rain, snow, or debris. Common signs are missing shingles, granule loss, dented or cracked shingles, damaged flashing, and water intrusion. Even if damage looks minor, it can lead to leaks, mold, and structural problems. Document everything with photos and notes, then contact a roofing professional for a full inspection to assess the extent.
How can I tell if my roof has wind or hail damage?
Wind damage often shows as missing, lifted, or creased shingles, while hail damage appears as dents, punctures, or bruised spots where granules have been knocked off. Check gutters for granule buildup and look for dents on metal flashing, vents, and downspouts. If you spot any of these signs, schedule a professional roof inspection before filing a claim, since proper documentation is critical for insurance approval.
Does homeowners insurance cover storm damage to roofs?
Most homeowners insurance policies cover sudden storm damage from hail, wind, or falling debris. However, coverage depends on your policy terms, deductible, and the age of your roof. Damage from neglect or normal wear is typically excluded. File your claim promptly, provide photos and receipts, and work with a roofing contractor who can document the damage thoroughly and communicate directly with your adjuster.
What not to say to a roof insurance adjuster?
Avoid saying the damage is old, that you are not sure when it happened, or that you plan to replace the roof anyway. Do not speculate about cause or minimize the damage. Stick to facts: what you observed, when you noticed it, and any photos or receipts. Let your roofing contractor handle technical discussions with the adjuster to ensure accurate documentation and a fair claim outcome.